PLACEMENT AND CURING OF CONCRETE
The placement and curing of concrete is a specialized process. In addition to proper ordering and delivery, concrete must be placed and cured correctly to achieve the intended strength and durability.
The concrete user must perform the curing process at the construction site in accordance with TS 1247 (rules for concrete production, placement, and curing under normal weather conditions) and TS 1248 (rules for concrete production, placement, and curing under abnormal weather conditions). Studies have shown that concrete which is not properly cured or poorly compacted exhibits lower strength and reduced resistance to environmental factors.
Placement of Concrete
Preparations Before Concrete Placement
The method of concrete placement and the casting duration should be determined in advance.
Formwork must be solid, clean, and properly oiled.
If a ground slab is to be poured, the soil must be compacted and moistened to make it suitable for pouring.
Upon delivery of the concrete, the properties of the requested product must be checked starting from the delivery note.

Figure 1: Oiling the Formwork
During Concrete Placement
Concrete should not be poured from a high distance (maximum 1.5 meters), as this may cause segregation and formwork failure.
Concrete should be placed in horizontal layers.
Vertical elements such as columns and shear walls must be filled in at least three stages.
Concrete should be poured as close as possible to its final placement point.
A vibrator must be used to compact the concrete. (The use of vibrators is mandatory under the new Earthquake Code.)


Figure 3: In mass concrete works, concrete should be poured in equal layers. Otherwise, it becomes very difficult to compact the concrete.
Considerations for Vibration:
The vibrator tip should be quickly immersed into the concrete and slowly removed.
The vibrator tip should never come into contact with the molds.
The vibrator should be inserted vertically into the concrete, and the insertion interval should not exceed 45-50 cm, depending on the vibrator's effective radius.
Vibration should be applied in overlapping areas. During vibration, the vibrator should penetrate 10 cm into the previous layer each time to ensure the layers bond properly.

Figure 4: Vibrated areas should overlap.

Figure 5: The vibrator tip should not be used to move the concrete horizontally.
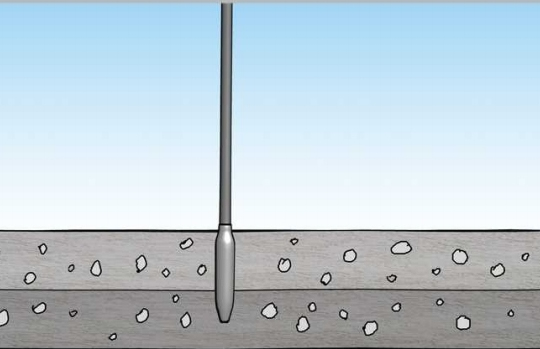
Figure 6: The vibrator tip should be worked into the lower layer to prevent cold joints.
Important Points to Consider During Vibration:
The vibrator tip should be quickly immersed into the concrete and slowly withdrawn.
The vibrator tip should never come into contact with the molds.
The vibrator should be inserted vertically into the concrete, and the immersion spacing should not exceed 45-50 cm, depending on the vibrator's effect radius.
Vibrations should overlap each other in the vibrated areas. During vibration, the vibrator should penetrate the previous layer by about 10 cm with each insertion, ensuring the layers bond together.

Figure 7: The vibrator used in the vibration process should penetrate the layer by 10 cm during each vibration. The vibrator type should be selected according to the concrete layer thickness.
Note: An increase of 1% in the air content of concrete reduces the concrete strength by approximately 5-6%.

Figure 8: Shrinkage cracks may occur after the compaction process due to environmental factors. If the concrete is still in a plastic state, re-vibration can be beneficial. Additionally, columns with 50-60 cm layers can be re-vibrated. This area is more difficult to compact due to insufficient weight on top.
Finishing of Concrete Surface
Vertical surfaces typically come into contact with the formwork, so different qualities and types of formwork are used depending on the desired surface finish. Sometimes, after the formwork is removed, additional finishing can be applied by hand or machine. Horizontal surfaces and some inclined surfaces are often finished without formwork. In such cases, machine methods can also be used for the finishing process.
In floor slabs, surface finishing is usually done with steel or wooden screeds and trowels. Where edge, bevel, and joint operations are required, edge finishing should be done first.

Figure 9: Cracks formed on the concrete surface should be followed by edge and joint finishing.
In some concrete surfaces, after the screeding and trowel work, a rake is drawn in a specific direction to provide the required roughness. In larger slab and paving concretes, vibrating screeds and mechanical trowels can be used.
Concrete curing refers to the process of preventing water loss after placing concrete or producing concrete products, ensuring that hydration reactions occur properly and on time. Cement hydration can continue for days, weeks, or even months. For the continuation of the hydration reaction, sufficient water and temperature are required. If these conditions are not met, the expected strength and durability of the concrete cannot be achieved.
To prevent concrete from drying out and losing water, thereby maintaining cement hydration, three methods are used:
The concrete surface is covered with a waterproof (nylon-polyethylene) sheet.
The surface of the concrete is kept moist continuously. This is typically achieved by spraying water with a hose or mechanical spraying system or by creating a water pond.
Chemical curing additives are applied to coat the concrete surface.
In concrete work, especially on large surfaces, evaporation of water can slow down the hydration reactions.
Water Curing

Figure 10: Watering the concrete surface with a hose.

Figure 11: Creating mist by spraying water on the concrete surface.
The concrete surface should be kept continuously wet. The appropriate curing period is approximately 7 days. This period should be extended during winter months. Spraying water to keep the concrete surface wet is a very good curing method. If this process is done intermittently, care should be taken to ensure that the concrete surface does not dry out. The only disadvantage of this system is its cost. To ensure the system operates properly, sufficient water and experienced applicators are needed.
Concrete surfaces can also be kept wet and evaporation reduced by using burlap or other water-retaining coverings. To prevent surface damage, water-retaining coverings should be placed as soon as the concrete hardens. Extra care should be taken, especially at floor corners, to ensure the coverings remain continuously wet.

Figure 12: Laying burlap on the concrete surface.
Curing with Chemical Compounds

Figure 13: It is important to ensure that the chemical material used, according to the instructions, does not come into contact with the skin or eyes.
Curing Concrete Surface by Covering with a Blanket
As seen in Figure 11, the curing materials used vary depending on the type of work. Chemical compounds that are white or aluminum in color form a thin polymer layer on the concrete surface. The water within the liquid evaporates over time, and the chemical substance in the compound forms a membrane-like layer on the surface of the concrete. This layer not only reduces evaporation to very low levels but also, especially in hot weather and applications like concrete roads, helps to reflect and scatter sunlight on the concrete surface.

Figure 14: Light-colored covers should be used in hot weather, while dark-colored covers should be used in cold weather.
Polyethylene covers should be applied to elements no later than half an hour after the molds are removed, and on floors, as soon as the concrete reaches sufficient hardness. The application should begin before the concrete surface dries. If the concrete is stamped or patterned, the covers should be placed on a light skeleton. This ensures that the concrete surface is not damaged. In this type of curing, there is no need to wait for the water in the concrete to sweat and evaporate before placing the polyethylene covers. The curing process can begin as soon as the concrete is placed.
Cold and Hot Weather Concrete Pouring
Cold Weather Concrete Pouring

Figure 15: The concrete temperature should be continuously monitored in cold weather.
When the three-day average temperature falls below +5°C, measures must be taken against cold weather. When ordering concrete, the effect of weather conditions on the concrete should be considered, and the temperature of the incoming concrete should be checked.
In rainy weather, especially if precautions cannot be taken, the pouring of slab and field concrete should be postponed. If proper measures (such as isolating and heating the pouring area from the outside environment) can be taken in advance, the pouring can continue. The surface contact areas and the molds may need to be insulated or heated beforehand. On-site, necessary materials and equipment to protect against early freezing of the concrete during or after placement should be available. Insulating blankets and plastic covers are commonly used. Corners and edges are the most sensitive areas to heat loss and require extra precautions. Care should be taken to avoid sudden temperature changes when removing the protective insulation materials.
Hot Weather Concrete Pouring
When the three-day average temperature exceeds +30°C, measures must be taken against hot weather. The most important issue when pouring concrete in hot weather is preventing the concrete from losing water. The measures to be taken can be summarized as follows:
The surface where concrete will be poured should be moistened and saturated with water. This prevents water from being absorbed by the ground from the fresh concrete.
Molds and reinforcement should be wetted.
If there is excessive wind, windbreakers can be placed around the pouring area.
Shade can be used to protect the concrete from sunlight.
All workers and necessary equipment should be ready for the concrete pour.
The concrete pour should be done during the hours of the day when the temperature decreases.
The concrete temperature should be continuously monitored.
Excessive vibration should be avoided.
The pouring should be completed as quickly as possible.
The finishing process should be done immediately once there is no water sweating on the surface.
Measures to prevent the concrete surface from drying out should be immediately implemented.
Note: Especially in hot weather conditions, if precautions are not taken in advance, ready-mix concrete will lose water due to evaporation by the time it reaches the site and before the pouring begins. This loss reduces the workability of the concrete and causes difficulties in applications. To avoid this issue, there are two ways:
Correct: Adjustments to water and additives should be made at the plant, considering the hot weather conditions. If necessary, a plasticizer can be added at the site.
Incorrect: Water should not be added to the concrete on-site, outside of the mix design.
Although adding water on-site may temporarily ease the workability of the concrete, it increases the water/cement ratio, which results in more voids in the concrete. This leads to weaker, more permeable, and less durable concrete.
It is incorrect to think that the water added to the concrete replaces the evaporated water. After a certain period, hydration will begin, and the effects of the added water and the original water in the mix will be very different.